Mapping the Battle
One way of telling the battle's story is through maps. There have been a number of maps created about the battle, some by or based on the accounts of the actual participants themselves. Below is a collection of maps that all tell the story. As you look at them, ask the typical questions you would of any primary source. However, also look at how the map is telling "the story" of the battle and how that story may be different from the stories of the other maps. A wonderful book that examines the battle just through maps is Michael Donahue's Drawing Battle Lines: The Map Testimony of Custer's Last Fight (Upton and Son's 2008) where the information presented below was drawn.
William Philo Clark Map (National Archives and Record Administration)
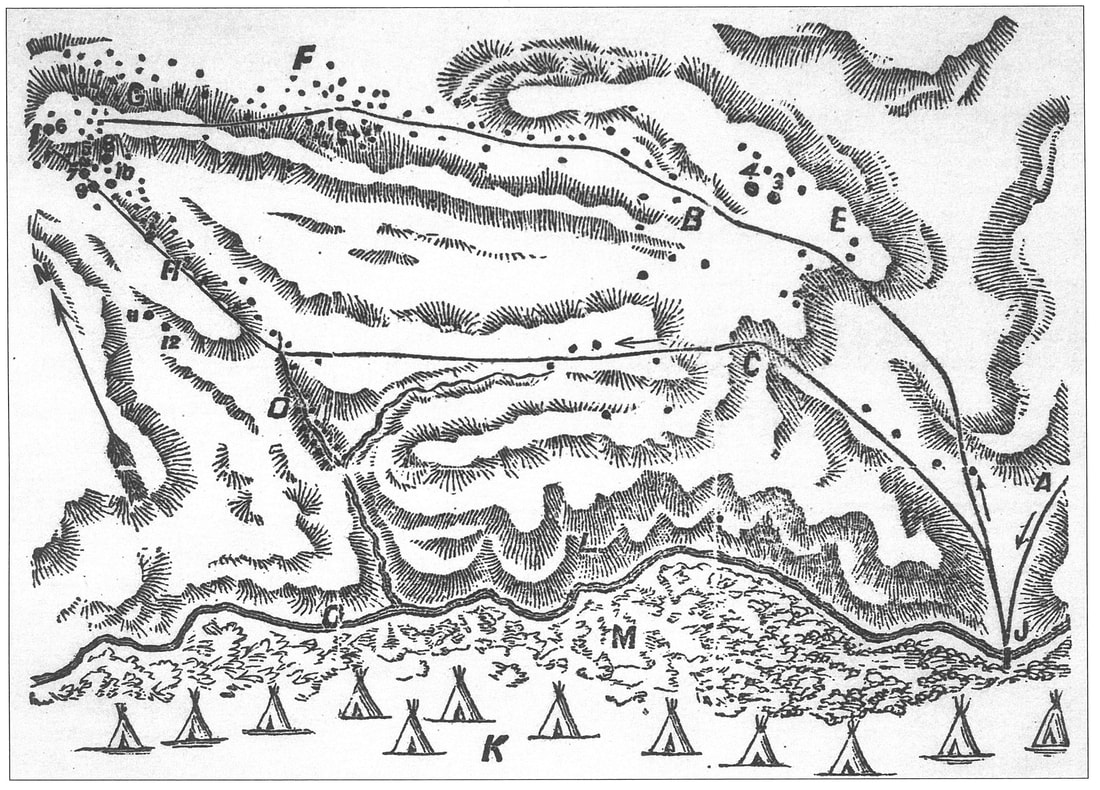
Clark was one of the first individuals to gather Indian testimony and to trace a sketch from a warrior participant at he early date of 1877. His map was one of the earliest attempts to portray the tribal circles and show the ravine where non-combatants hid. His map is the only sketch showing a natural trail below and northwest of Custer Hill. It notes an attempt by soldiers to cross the river near the non-combatants, something later verified by the archaeological work done in the 1980s and 1990s.
Clark was one of the first individuals to gather Indian testimony and to trace a sketch from a warrior participant at he early date of 1877. His map was one of the earliest attempts to portray the tribal circles and show the ravine where non-combatants hid. His map is the only sketch showing a natural trail below and northwest of Custer Hill. It notes an attempt by soldiers to cross the river near the non-combatants, something later verified by the archaeological work done in the 1980s and 1990s.
Edward Godfrey Map (Phoebe Apperson Heart Library, Lead, SD)
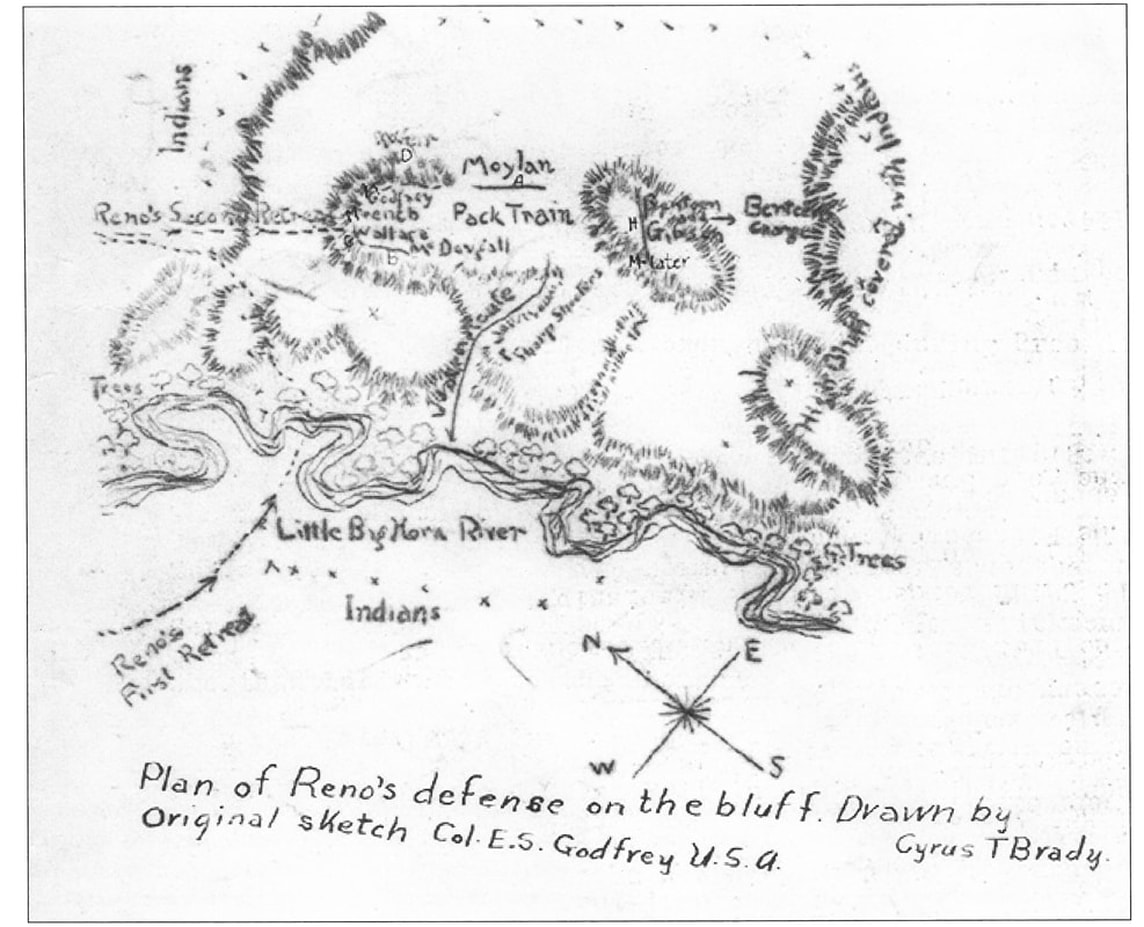
This map of Reno Hill was actually drawn by Lieutenant James Wilson. It was created almost 16 years after the battle and many of Godfrey's personal observations and theories seem to attempt the map. His sketch is one of the few to portray the positions of companies on Reno Hill.
This map of Reno Hill was actually drawn by Lieutenant James Wilson. It was created almost 16 years after the battle and many of Godfrey's personal observations and theories seem to attempt the map. His sketch is one of the few to portray the positions of companies on Reno Hill.
OSCAR LONG MAP (Univ. Calif. Berkeley)
This ealry map was created two years after the battle using warrior testimony and Lt. Long's personal observations. IT show the village bing a little over one mile in length and a fairly accurate composition of the layout. Most interesting is the ravine near the Reno Skirmish line and the two ravines in the valley across from Custer Hill. This map shows troop division before the soldiers reached Calhoun Hill as well as forty men in Deep Ravine. Most accounts mention approximately 28 bodies found there.
This ealry map was created two years after the battle using warrior testimony and Lt. Long's personal observations. IT show the village bing a little over one mile in length and a fairly accurate composition of the layout. Most interesting is the ravine near the Reno Skirmish line and the two ravines in the valley across from Custer Hill. This map shows troop division before the soldiers reached Calhoun Hill as well as forty men in Deep Ravine. Most accounts mention approximately 28 bodies found there.

George Glenn Map (Little Bighorn National Battlefield Monument)
The Glenn map is one of the few drawn by an enlisted man. While filled with errors, it represents his honest perspective as an enlisted soldier complete with misidentifications, misspellings, and a somewhat limited focus. it is the only map that shows the death site of Thomas Tweed, Company L. It also verifies a trail used by Custer's troops before retreating toward Custer Hill. It is also one of the few maps that includes warrior trails in the valley.
The Glenn map is one of the few drawn by an enlisted man. While filled with errors, it represents his honest perspective as an enlisted soldier complete with misidentifications, misspellings, and a somewhat limited focus. it is the only map that shows the death site of Thomas Tweed, Company L. It also verifies a trail used by Custer's troops before retreating toward Custer Hill. It is also one of the few maps that includes warrior trails in the valley.
Kill Eagle Map (Little Bighorn Battlefield National Monument)
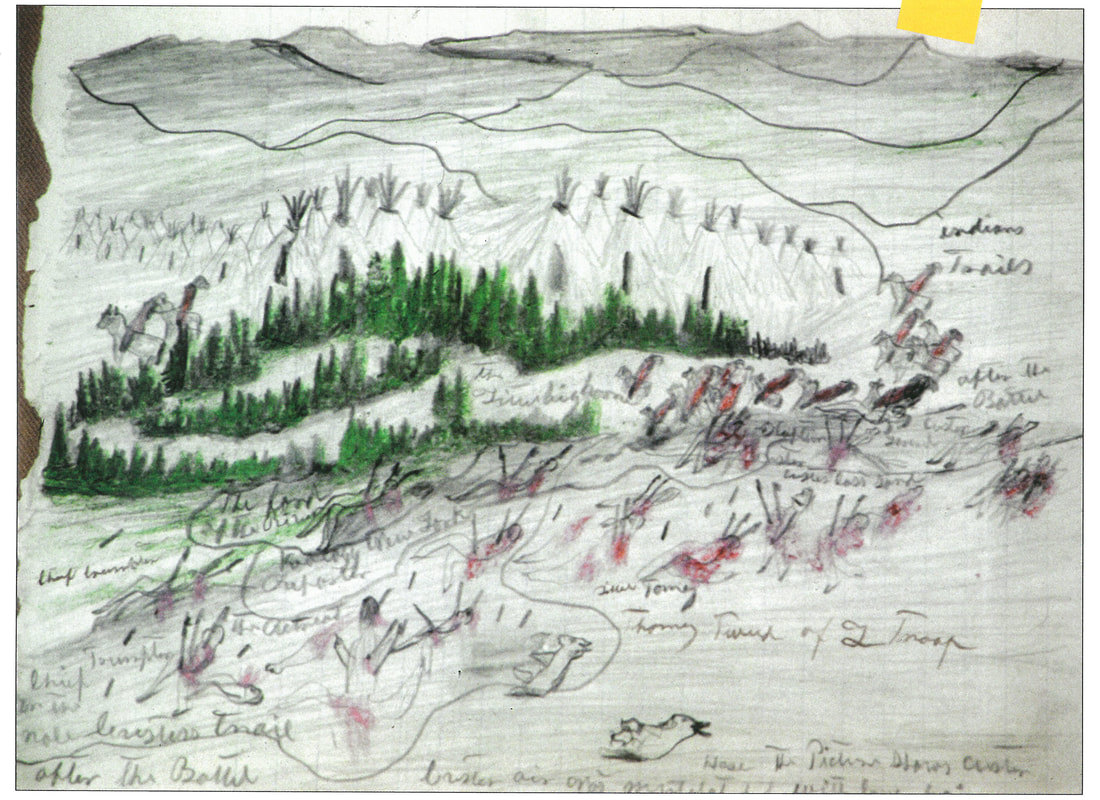
Kill Eagle's map is one of the earliest Indian maps of the battle. WHile he was not an actual participant, he was in the village and witnessed some of the action. The map is skewed in scale and some details (such as including Sitting Bull's participation and the village size). The map shows a fight beyond Custer Hill as well as the warrior advance from Greasy Grass Ridge. This is the only Indian map that portrays the village retreat after the battle.
Kill Eagle's map is one of the earliest Indian maps of the battle. WHile he was not an actual participant, he was in the village and witnessed some of the action. The map is skewed in scale and some details (such as including Sitting Bull's participation and the village size). The map shows a fight beyond Custer Hill as well as the warrior advance from Greasy Grass Ridge. This is the only Indian map that portrays the village retreat after the battle.
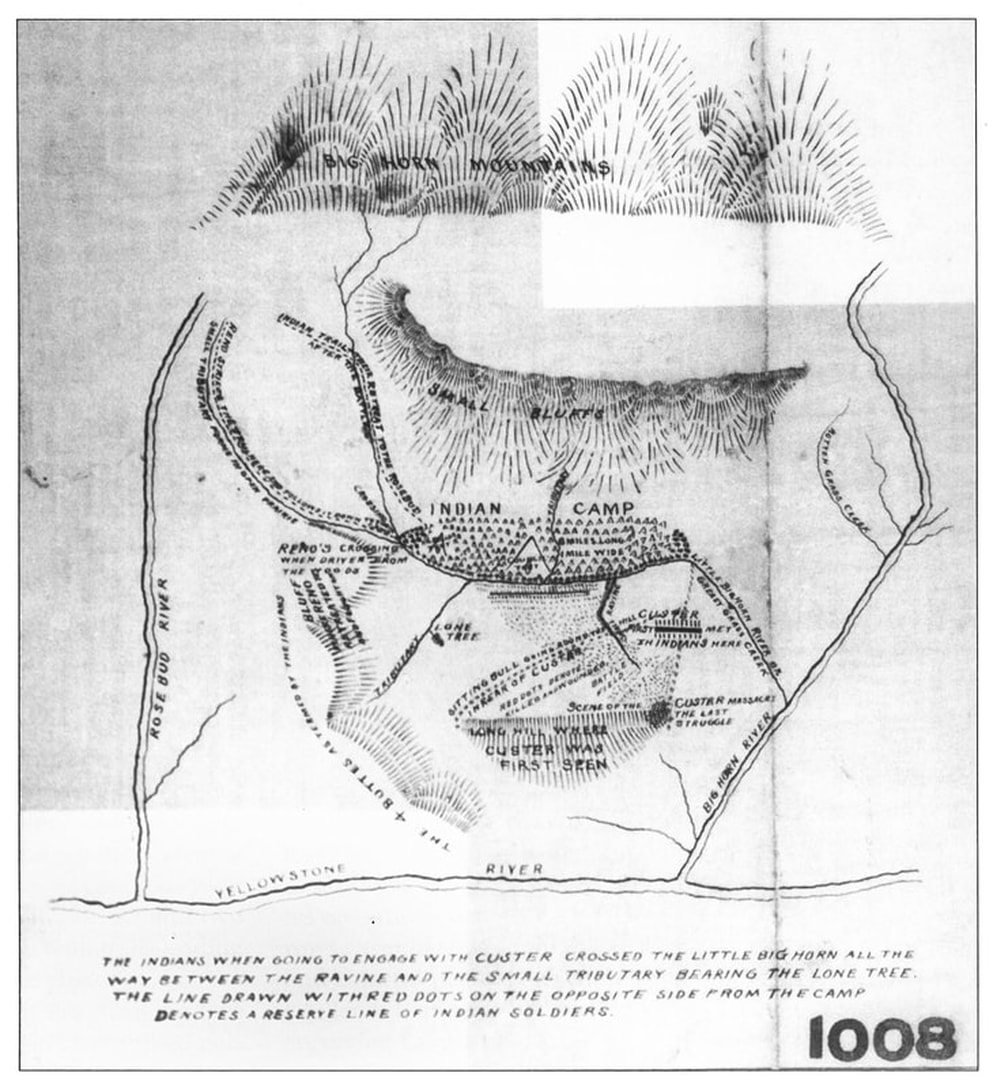
Sitting Bull Map (Army and Navy Journal)
This map, while not drawn by Sitting Bull, was used to verify and interpret his oral testimony. It has numerous errors such as the village being nearly 4 miles long as well as the positions of Reno's and Calhoun's troops. It correctly notes the 28 men who sprinted into Deep Ravine from the top of Custer Hill (possibly the actual end of the battle), Custer's approach to Ford B, and the location of Onion Creek. The map is interesting since it was created one year after the battle and corrected by Sitting Bull.
This map, while not drawn by Sitting Bull, was used to verify and interpret his oral testimony. It has numerous errors such as the village being nearly 4 miles long as well as the positions of Reno's and Calhoun's troops. It correctly notes the 28 men who sprinted into Deep Ravine from the top of Custer Hill (possibly the actual end of the battle), Custer's approach to Ford B, and the location of Onion Creek. The map is interesting since it was created one year after the battle and corrected by Sitting Bull.
Standing Bear Map (Nebraska State Historical Society)
Standing Bear's map shows Custer traversing Nye/Cartwright Ridge, as well as Reno's fight and retreat. His village site notes six tribal circles, and he designates the area near Squaw Creek where the women gathered. A mysterious ellipse west of Custer Hill likely refers to a fight in this area.
Standing Bear's map shows Custer traversing Nye/Cartwright Ridge, as well as Reno's fight and retreat. His village site notes six tribal circles, and he designates the area near Squaw Creek where the women gathered. A mysterious ellipse west of Custer Hill likely refers to a fight in this area.

John Stands in Timber Map (Margo Liberty)
This map was created on the battlefield and shows details of warrior and soldier movements. WHile it includes several warrior positions not seen on any other map and the warrior's advance up the valley, it does not report Custer's advance to Ford B or the fight at Calhoun Hill. While Many researchers dismiss warrior accounts to to suspect interpretation, this map stands apart and is backed with archaeological evidence. It was created without the need of a translator and was founded on the battlefield observations of warrior participant Wolf Tooth. It includes the site fo the fleeing lone soldier that of Lame White Man.
This map was created on the battlefield and shows details of warrior and soldier movements. WHile it includes several warrior positions not seen on any other map and the warrior's advance up the valley, it does not report Custer's advance to Ford B or the fight at Calhoun Hill. While Many researchers dismiss warrior accounts to to suspect interpretation, this map stands apart and is backed with archaeological evidence. It was created without the need of a translator and was founded on the battlefield observations of warrior participant Wolf Tooth. It includes the site fo the fleeing lone soldier that of Lame White Man.
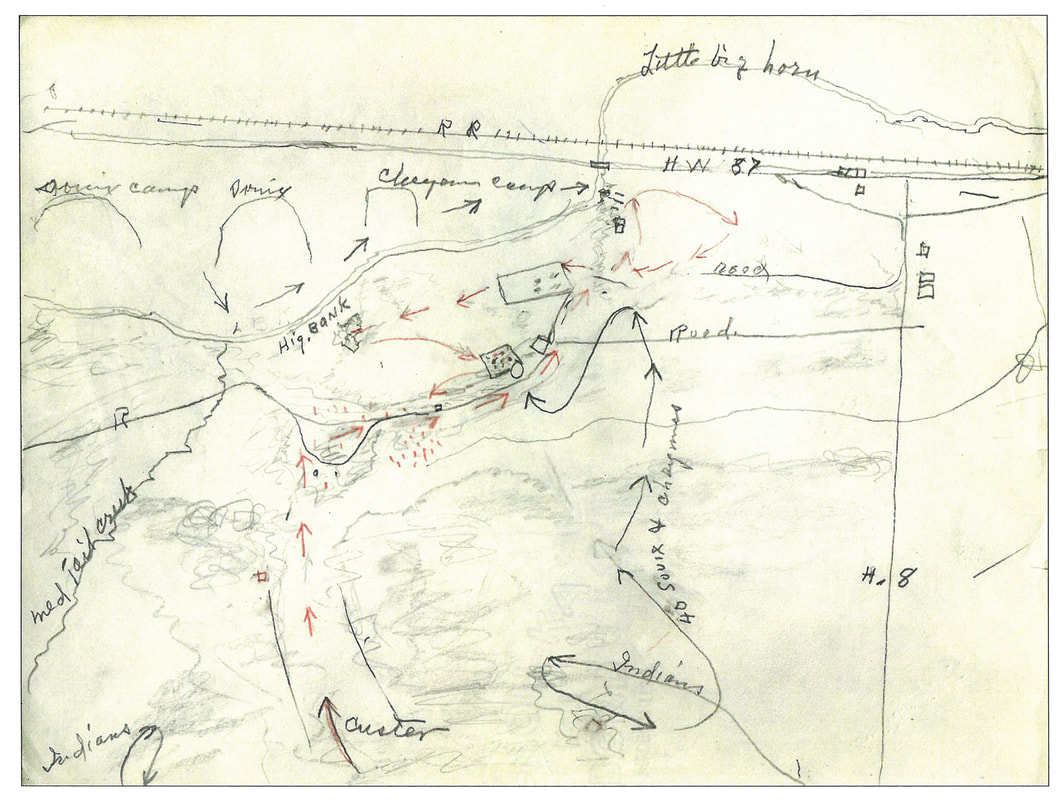
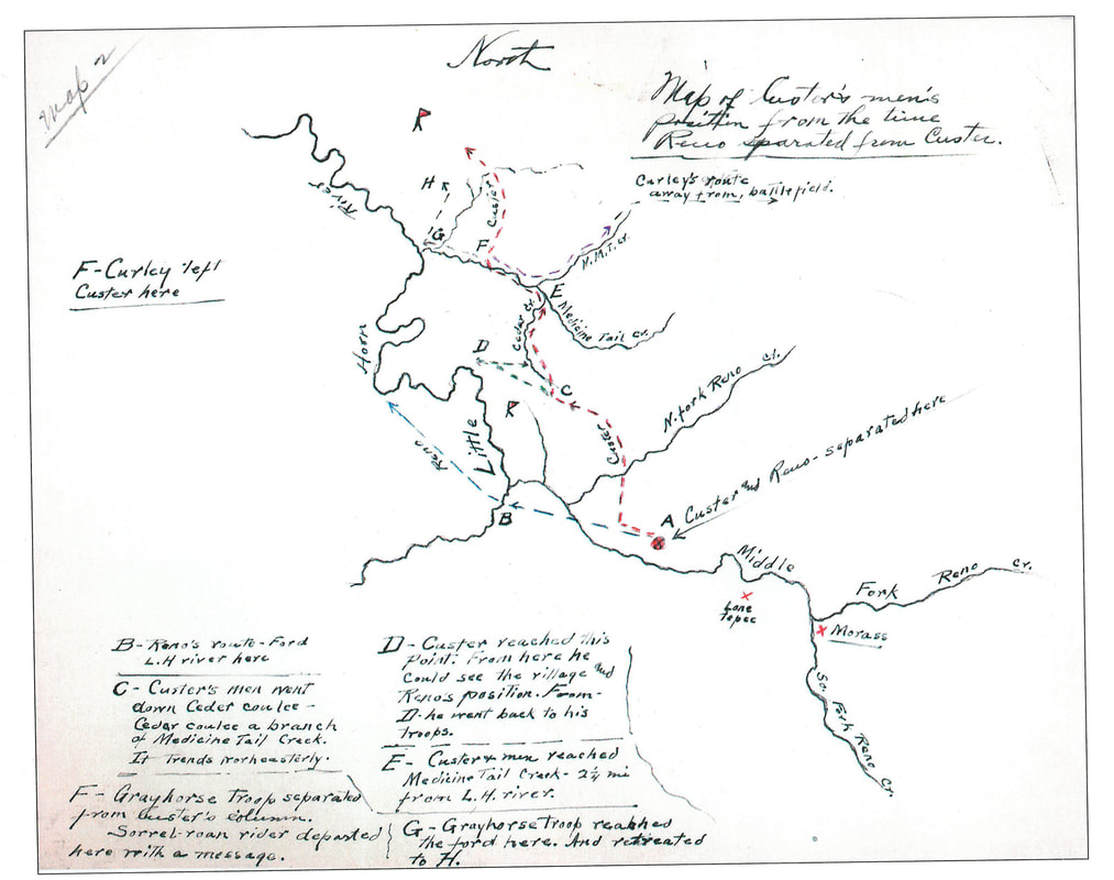
Walter Camp Map of Medicine Tail Coulee (Brigham Young University)
Walter Mason Camp was a civil engineer for the Rainer Avenue Electric Railway in Seattle but had an avid interest int he history of the American West, specifically the battle fo the Little Bighorn. He drew several maps after visiting the site and interviewed approximately 200 survivors of the battle. This map may be based on Curley's account given to Russell White Bear. It mistakenly notes the lone tepee on the south side of Reno Creek. This map give evidence of Custer's movements and halts in medicine Tail Coulee. It notes a split in the command which seems verified by artifacts discovered at Ford B and Luce/Nye/Cartwright Ridge. This map indicates Custer himself advanced with the troops to Ford B and also shows Curley leaving the command in Medicine Tail Coulee.
Walter Mason Camp was a civil engineer for the Rainer Avenue Electric Railway in Seattle but had an avid interest int he history of the American West, specifically the battle fo the Little Bighorn. He drew several maps after visiting the site and interviewed approximately 200 survivors of the battle. This map may be based on Curley's account given to Russell White Bear. It mistakenly notes the lone tepee on the south side of Reno Creek. This map give evidence of Custer's movements and halts in medicine Tail Coulee. It notes a split in the command which seems verified by artifacts discovered at Ford B and Luce/Nye/Cartwright Ridge. This map indicates Custer himself advanced with the troops to Ford B and also shows Curley leaving the command in Medicine Tail Coulee.
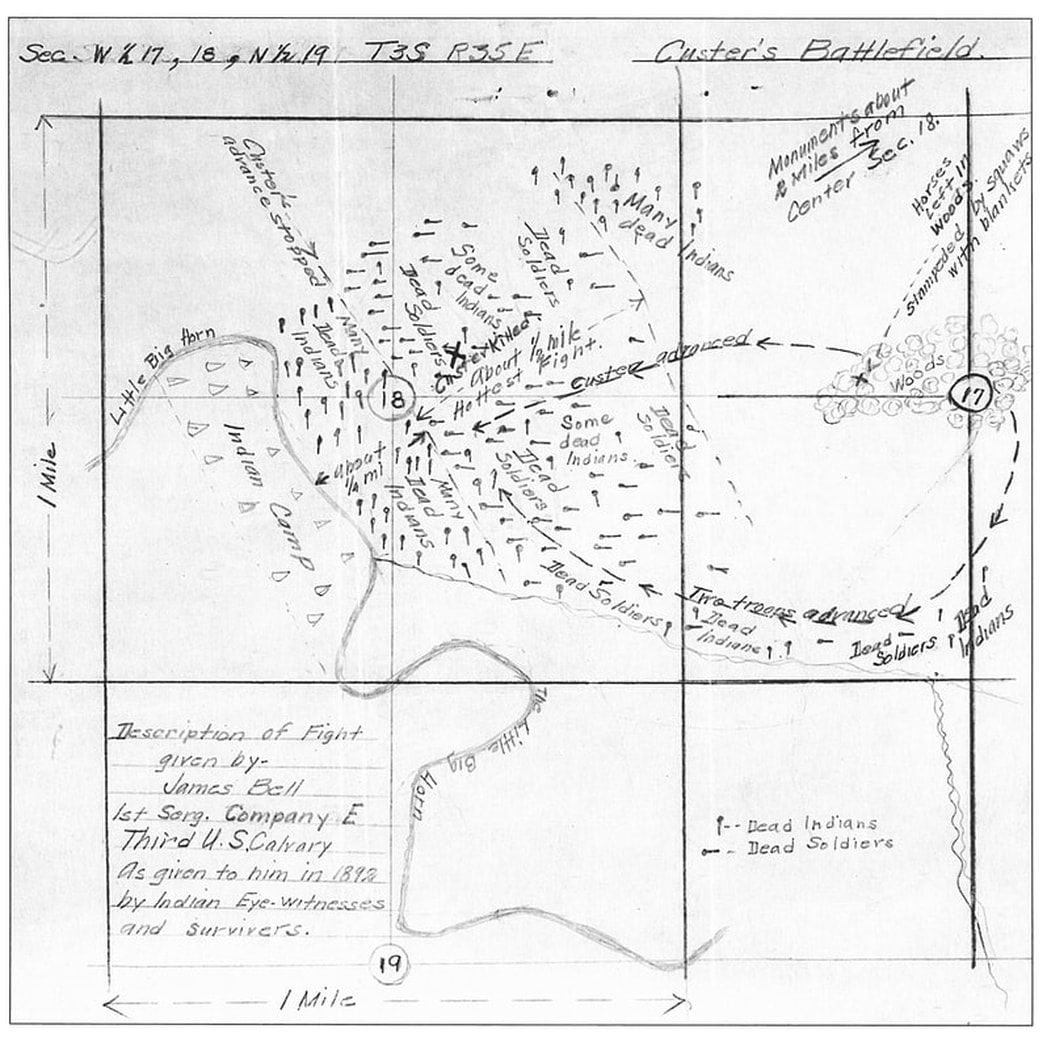
James Bell Map (Yale University)
This map seems to have been collected from warrior accounts, although it was obviously not created on the battlefield as the mapmaker would have known some distances were incorrect. The casualties noted are an obvious error, however, several aspects fo the map seem to be backed by other evidence: the correct river bend in 1876, an advance to the north, and a fight in the area backed by artifact evidence. This map shows that Custer's horses were stampeded by women near the area that Custer was killed.
This map seems to have been collected from warrior accounts, although it was obviously not created on the battlefield as the mapmaker would have known some distances were incorrect. The casualties noted are an obvious error, however, several aspects fo the map seem to be backed by other evidence: the correct river bend in 1876, an advance to the north, and a fight in the area backed by artifact evidence. This map shows that Custer's horses were stampeded by women near the area that Custer was killed.
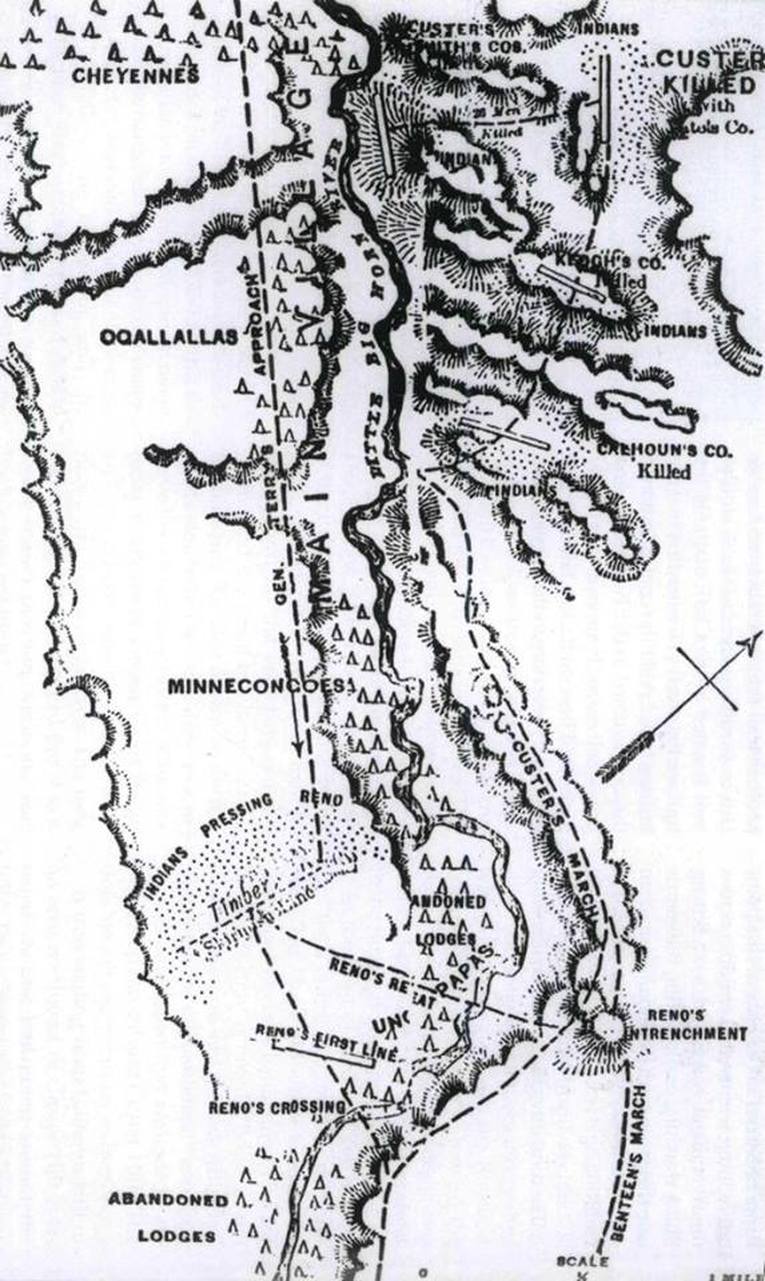
New York Semi-Weekly Tribune Map
This map is important as it is the first battlefield map published and afforded the general public the initial image of the locations of the dead. It suggests Custer's movements but notes the soldiers retreating to Custer Hill in two divisions from the river. It also notes the 28 bodies in Deep Ravine and that the Indian Village extended below Custer Hill.
This map is important as it is the first battlefield map published and afforded the general public the initial image of the locations of the dead. It suggests Custer's movements but notes the soldiers retreating to Custer Hill in two divisions from the river. It also notes the 28 bodies in Deep Ravine and that the Indian Village extended below Custer Hill.